OK, sure most have you seen my original FrankenSpider legs made of Zip Ties. They work great, are super light, super cheap and work also somewhat as shock absorbers. But over time, well they began to sag. They were made of super heavy duty zip ties (120lbs strength not the cheapo 50lbs ones that are common in most homes) which I think I forgot to mention when I did the posting before about how they were made.
Well one new issue, I just got a Runcam2 and it's a tad bit thicker that the older RuncamHD, which when strung under the quad was already a bit to close to the ground and I am not gunna have my new Runcam2 bouncing off rocks and such during landings...
Sagging
No clearance
Well, simple solution is to just use longer zip ties right? well no, they just end up sagging more, and higher strength ones that would hold up wont fit in the holes and such as they are wider. So, what to do? Well use longer, but actually slightly weaker zip ties (11" 75lbs strength) and just add a short piece of straw slipped over to stiffen up the leg... :)
Works like a charm! Still light, still flexible and springy, still ridiculously cheap to do.
Straws added
I did pull a bit through the hole in the motor mount and bent it over, tucked it back into the straw and put a dab of glue on the tip to keep it from pulling out of the straw. Clears the Runcam2 now easily !
OK, been using this basic mount system on the Frankenspider and basically the same setup on the stock Tarantula X6 and been getting near perfectly clear of jello video from both quads. The Tarantula I use the stock anti vibe mount and just cut a hole in the battery door to get the wire out the front, strap the battery and camera to the anti vibe plate and it's perfect.
My Cousin just ordered a Tarantula and I told him NOT to get the camera as I'll give him my old stock one for now and he can get a Runcam or Mobius later. But, no camera, no anti vibe mount! So what if you didn't get the stock camera with your tarantula? they don't sell the mount separately. Well I've figured out how to mount the WLtoys v262 camera mount, that I've been using rather successfully on my FrankenSpider for some time now, and attach it to the Tarantula,..rather easily! So I built this for him and made this tutorial as I went,(sorta, I jumped around building, but wrote this in a better order of operations to save you some of the supid frustrations I encountered)
There is some minor cutting and you'll need a few extra screws and it's probably a good idea to have some glue or epoxy to strengthen a few spots, but generally it's a simple setup and makes for the best I've found mount for a camera to the Tarantula (or FrankenSpider, which it bolts right to ;) )
Here's how I did it. I'm sure someone will come along and figure out how to improve it even more!
You'll need to have
WLtoys V262 camera or shock mount. Do a google search for best price and location to buy.. seen it for around $5 bucks and no more that $10
WLtoys v262 battery holder (can just use a strip of something instead)
ASpare Battery Doorfor the Tarantula. Can just use the one you have but I always prefer to mod extras so I can return to stock if I want.. they are usually under $2 bucks.. shipped
Some extra screws. Again do a google search for WLToys v262 spare screws.. many of the Chinese retailers will have it, stock changes so search around for availability and price.
May want someepoxyor similar glue/filler
Super Glue or similar
Old Mouse Pad or other rubbery material
Tiny Zip Ties
Step One - Cut a small hole in the Tarantula's battery door, it needs to be just big enough to get the power cord out the front. DON'T notch the door as you need it to be structural, if you cut that edge lip it can actually let it flex during flight and the front tabs to the body can pop out! Been there, done that, not pretty!!
hole in battery door - leave edge lip for structure!
Step Two- Mount the WLToys mount's flat plate to the battery door. This is probably the hardest part as it's kinda difficult to locate the tiny screw holes.
First off, cut off the 4 mounting legs from the WLToys flat plate. they just don't line up anywhere that is useable that I could find.
WLToys mount legs cut off
Line up the door and plate.. NOTE THERE IS A FORWARD-SIDEWAYS DIRECTION! if you turn is sideways the battery will end up sideways, the mount is NOT SQUARE but a rectangle. The notches or indents in the plate need to be on the sides.
Note: notches in plate need to be on sides
Now you need to locate the studs on the battery door. and punch holes through the plate.
(Note- if using a Runcam or Mobius you can probably cut them off, and lay the door and plate flat together, screw through pretty much anywhere, but if using a Tarantula Stock Cam you'll need the height clearance to get the wires and plug in the body of the quad)
They need to be small holes, I have a rotary tool with extra tiny bits, but a hot pin or needle will do the trick too. The two upper screws you may notice are right up against the rib in the plate, they actually line up right UNDER THE RIB, but, there is enough flex in both the plate and battery door studs so you can flex them over and not cut the structural rib. I did add some UV Glue to make the area stronger, just cuz! (UV glue is just UV light cured epoxy, regular epoxy would be fine too)
touch of glue or epoxy for added strength
Step Three- Now you have the plate mounted you just have to do minor mods to the lower plate.
There are built in "safety catches" with the WLToys mount. basically there are 2 stud in the flat plate that stick through larger holes in the lower plate , you put a screw with a larger washer in the stud and if the balloons ever ripe or pop free the screws catch the plate and keep your camera from falling to the ground. GREAT idea.. but, I found during flight the weight of the battery and camera moves the balloons more than the holes allow, so you end up having contact between the upper and lower plate and all the vibrations transfer right through, honestly I think it makes it worse as when they hit you get an obvious jolt in the video. So I cut them off and make my own safety catch out of zip ties. Cut off the stubs to their safety catch then stick the balloons through and mount the flat plate with the lower plate.
Cut studs
Now you can just use the WLToys battery box, but I found that it's not the greatest as I have many batteries that are slightly different sizes and some are way too tight, while others are so loose that they fall right out. Plus it's hard to get somewhere to attach anything to hold the camera. So... I knocked out a chuck of the battery box and made a place for a velcro strap to run through. and screwed it in place.
Cut out chunks of battery box - and mount to lower plate
Now, glue little pieces of rubbery stuff to the mount and the bottom of the camera. not so much for anti vibration,though I'm sure it helps a little, it's to keep the battery and camera from slipping around during flight. I just use pieces of old mouse pad and rubber floor mat and glued down with a few drops of crazy glue
Rubbery grip padding glued to mount and camera
Step Four - assemble the upper and lower plates together.
Simple pull the balloons through the holes and seat. I do take some little zip ties and run them through the balloons and around for protection so if the balloons pull out or rip then the camera and battery aren't lost. you need the one running through the balloon to be nice and straight so it doesn't bind the movement, also make it a bit long as when you add the battery weight and camera the balloons stretches out a bit.
zip ties kinked to prevent binding the balloons movement.
Lastly, mount up the battery and camera... Slip a velcro strap through the cut battery box mounts, slide the battery in and get the velcro up and over it. When you tighten it up it'll actually press the battery down and into the mount, place the camera on top and tighten up the velcro over it.. done!!
Velcro needs to go over the battery not under!
All strapped in!
Run the power cable out through the battery door hole and slide the whole assembly onto the Tarantula! Plug her in and go fly!!
So something has been bothering me about my lovely Tarantula quads.. Prop slop - the motion the blade can have without moving the drive shaft or engaging the gears of the motor.. Uggg it's friggin terrible and honestly I believe it feeds back a lot of the jello and vibration in video when flying with a cam. Even when brand new there is actually a rather large amount of it, and we all assumed it's the prop/screw interface... Well, it's not! I took a deep depth look at a VERY sloppy one on the Frankenspider and found a few things.
ONE- the screw is holding to the prop just fine, it's the hole in the drive shaft that is too big. causing a bit of motion before the screw contacts the drive shaft and feeds back as play out at the end of the prop.
TWO- the actual lower gear is also slipping a bit on the drive shaft, no where near as much, as the screw goes all the way through, but, it's movement amplifies any slop up top.
Well I fix it, (at least temporarily) so there is close to zero slop.. and what little is left is the actual gear interface. how? Very simply..
On the bottom gear I took a drop of crazy glue and dripping it right inside the drive shaft and using one of the smallest Zip ties I stuck the point in and kinda swished it around the inner area of the screw and drive shaft interface, and the little glue stuck to the tie wrap tip I ran around the outer edge on the bottom of the gear and drive shaft (obviously don't do the top because the glue can screw with the bearing and glue it if not dry and even if dry it could mess the "face" of the gear and how it sits on the bearing/bushing)
The top took a bit more brain power but is actually pretty easy once I thought about it. instead of filling the hole which I was thinking of maybe a drop of solder then filing down smooth.. I stuck the pointed end of the zip tie in the top of the shaft, added another to fill the space more and snipped then off flush. Now when I tighten up the prop screw it pushes the zip tie tips and claps everything stiff (think bicycle seat post clamp)
video of how it's done..
(note I forgot to turn on mic so just did text and added music for fun )
Just did a quick flight and watching the video it has smoothed out a LOT .. (will edit up and post later) don't get me wrong, it's still not 100% but it's defiantly better. Especially in descents where even with my anti vibe setup I'd still get heavy vibration and jello.
Now you could probably use anything inside the upper tube to fill it. Even thinking a Q-tip with some glue or something to harden it, maybe even a bit of softer epoxy (remember the screw still needs to get through) I'm sure someone will come up with a better method.. but this might get them thinking!
If Prop slop bothers you, give it a try. Honestly, you probably can't make it any worse!! LOL
Some fact and info about the FrankenSpider build - Will be adding stuff as I go..
WEIGHT -
Lots of people are asking about the weight.. well got around to doing it today..
Looks like there is about 70 Grams weight loss. Note the full Tarantula has the prop guards on where the FrankenSpider has no guards. That's a few grams right there but the build is still a decent Weight Watchers Approved savings!
FLIGHT TIME -
OK, today I got just over 8 minutes flight time. Now this may not seem great but, the thing is built with older motors and bearings which have had MANY flights and crashes. Also the Batteries I have are getting old and have a rather large number of flights/recharges on them.
Also carrying the RunCam HD.
Note the same setup right now (cam, battery and such) I'm only getting a little over 5 minute with my completely stock Tarantula..(which is just as worn out) so the 8 minutes is rather good!
I'm guessing with New motors, bearings, gears and a newer battery I'd say well over 10 minutes and likely up to 12 is possible!
(a crashed Tarantula X6 revived with a WLToys v262 frame)
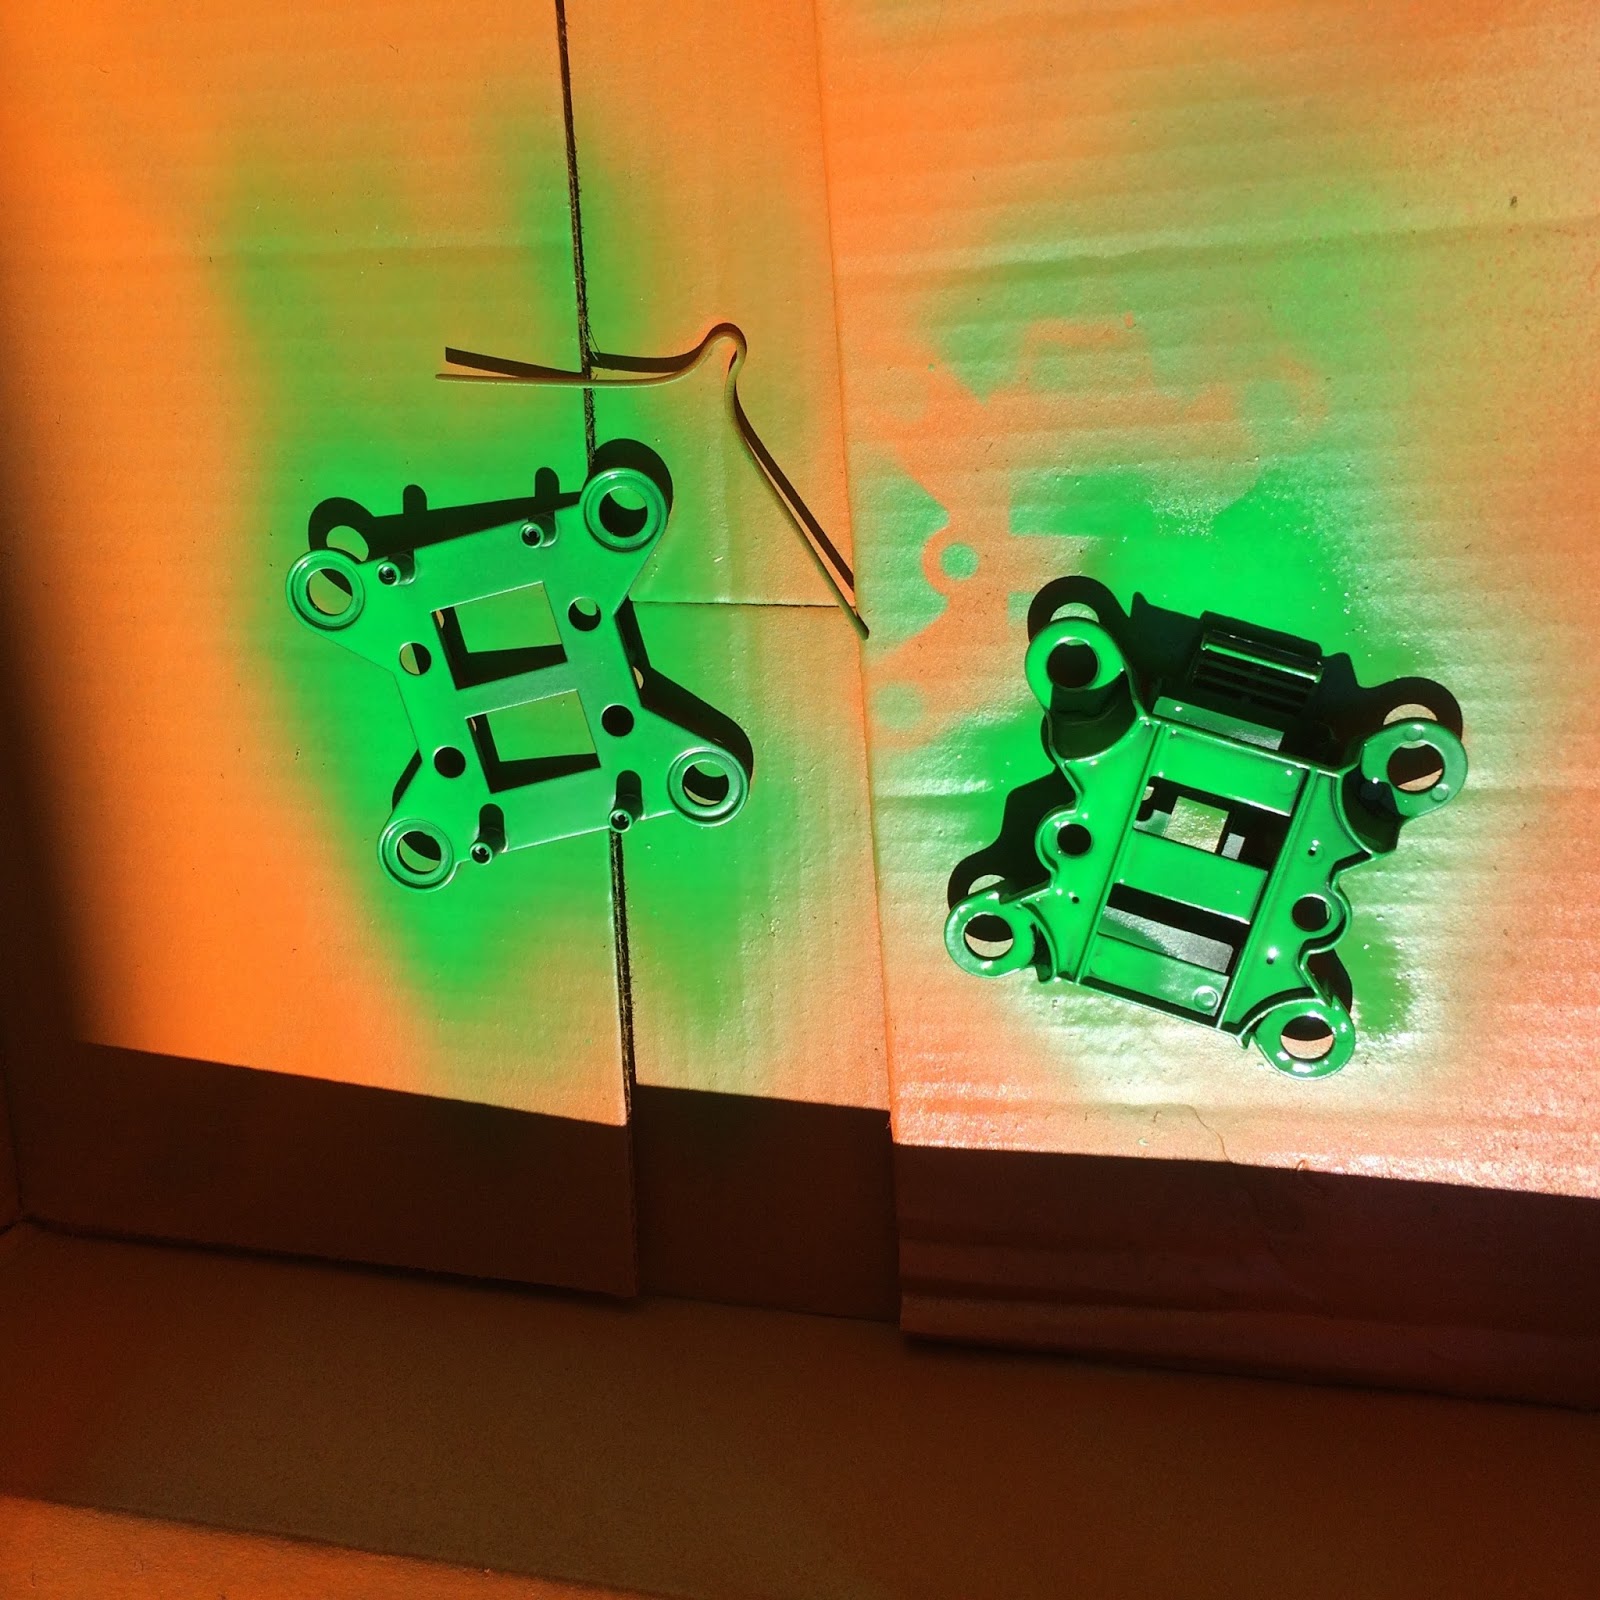
So as many of you may know (and have probably discovered yourselves) I've been trying to get Tarantula bodies for my quadcopter. But seem to always come broken because none of the retailer will ship them in proper packaging to protect it well. So basically I gave up on stock Tarantula body and decided to try a WLToys frame from a V262/666 quadcopter to see if I could cheaply build one with the Tarantula's electronics. I am 95% successful. There are a few tweaks that I want to adjust, but I have the major stuff figured out and she flies very reliably. I now have torn it back down as I want to straighten out a few things from the original build being rushed and kinda an learning experience. I am going to paint the body and document the reassembly as best I can as I have gotten a butt load of requests for information on what is needed, how to go about it, and any issues or tricks I learned during the build.
OK, the paint -I shot the frame this morning with the Orange and think I'm going to hit the front or back with a day-glo green for a little assistance with visual orientation as it's VERY hard to see it in black with it being so thin and small.
OHH Orange!!
Orange and green clash nicely!!
Now let's get into the build...
1st off -
The Parts I'm using here are as much from the Tarantula as I can, well, because I have them. All electronics are off the Tarantula as well as the motor mounts, gears, motors and props and even 90% of the screws.
The WLToys V262/V666 parts are listed...
one body (WLtoys V262 V333 V666 RC Quadcopter Spare Parts Main Frame)
one battery box (Spare V666 - 03 Battery Box Fitting for Wltoys V666 RC Quadcopter)
Really that's all you need. I did add the anti vibe camera mount as I want to carry my RunCam HD on it.
Anti Vibration Camera Mount (Spare Anti - Vibration AB Fitting for Wltoys V666 RC Quadcopter)
Anti Vibe Balloons (Damping Ball Fitting for Wltoys V666 RC Quadcopter)
It seems now you can purchase it as a whole anti vibe/camera mount unit but when I ordered they only came separate. Also the little screws and washers for the separation prevention safety were just stuff I had laying around as they didn't come with it.
Assembly of the frame is pretty straight forward. Slide the arms in the body, make sure they are seated then slide the motor mounts over the ends of the arms. The Tarantula motor mounts slide over the V262 carbon arms snuggly, down right perfect, almost like they were made to be used that way.. (hummmm, shared mold maybe? ;) )
(Click images to enlarge)
Some minor issue, the carbon arms I used have no holes or anything drilled in them and the Tarantula's motor mounts are held by the body halves studs screwed together holding it, nothing is actually screwed to the mount it's self, it's just pinched between the Tarantula shell.
For the body to arm mounting, the screws thread into the body so I just used some square point screws (no actual point to make a hole and crack the carbon) and pinched it lightly. worked awesome. For the arms to X6's motor mounts attachment I drilled a very small hole in each arm right where the stud in the Tarantula's body went through. screwed a small screw in that fit just inside the stud hole in the mount. Simply, it prevents the mount from sliding off the arm. I put a few drops of crazy glue in and around the hole to help prevent the carbon from cracking. (works great as the whole motor mount broke during a major crash last night so it's sure not coming off)
(Click images to enlarge)
The battery box is just screwed to the under side of the frame where there are 4 studs. If using the camera anti vibration mount the battery box screws to it. The battery adds weight to the dampening system as the camera it's self aren't usually enough weight to activate the balloons.
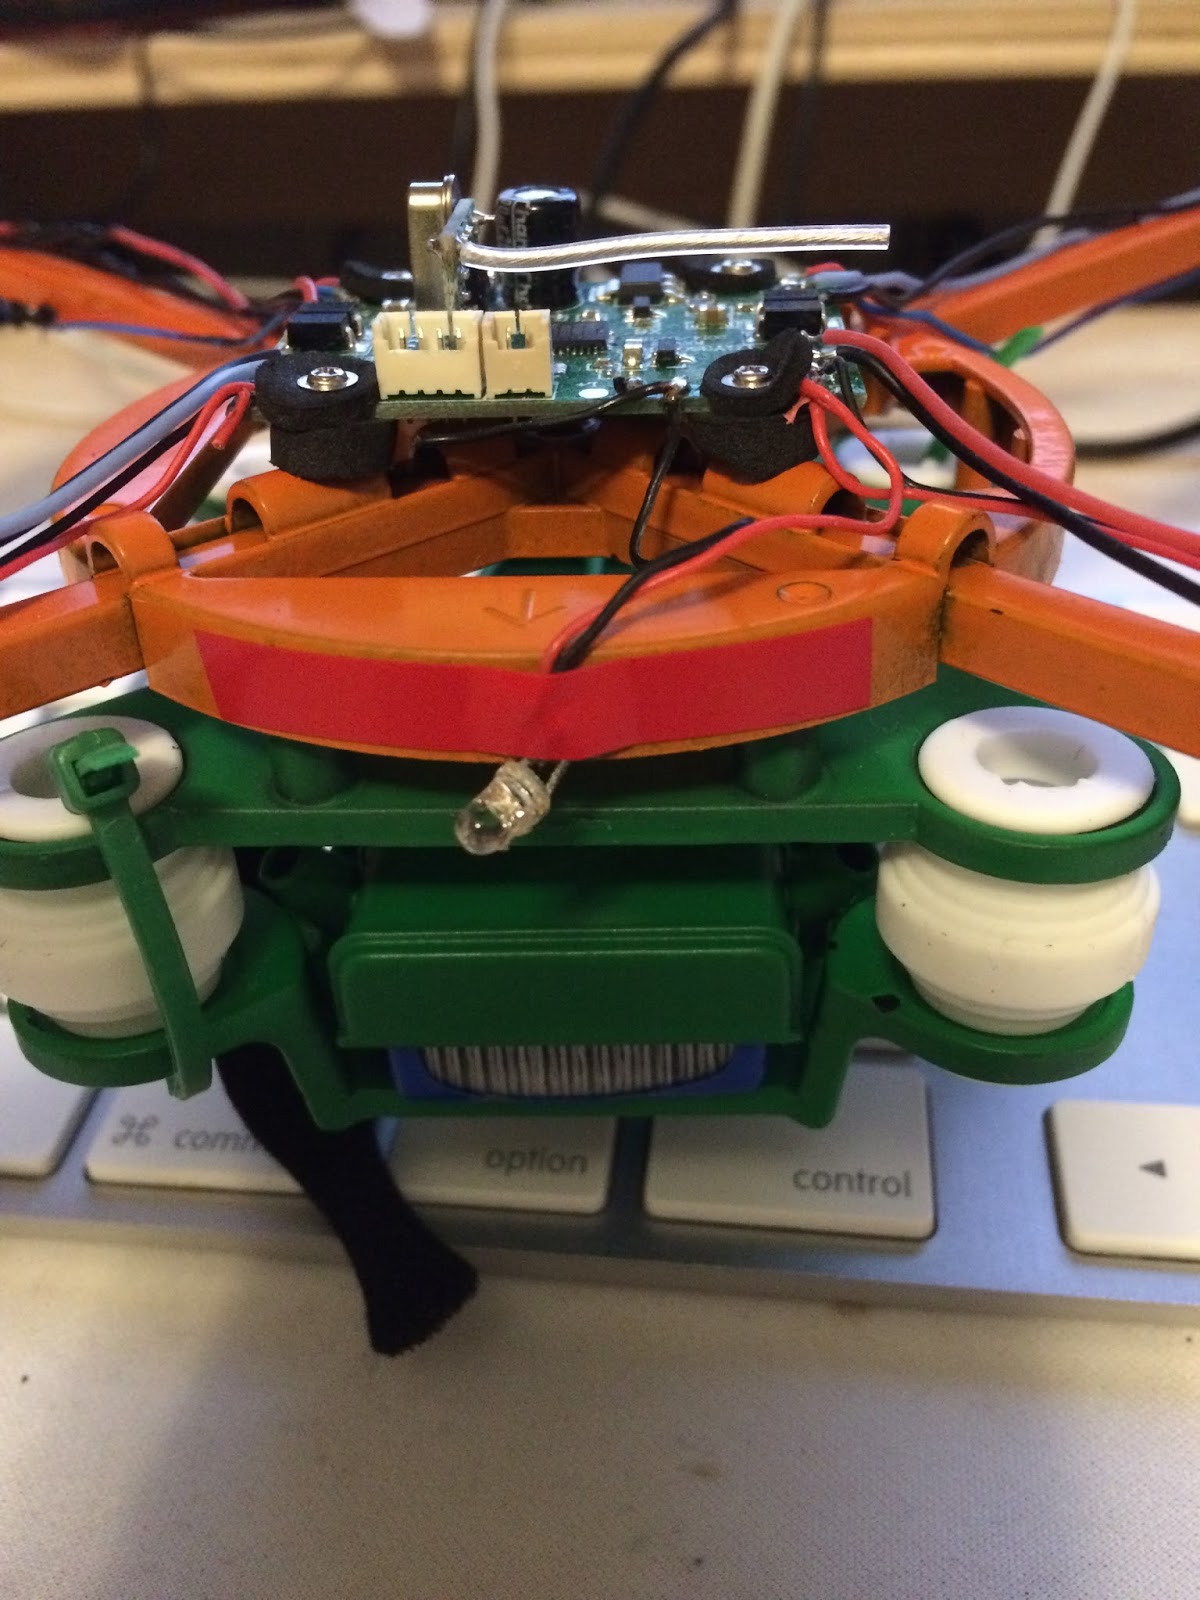
Electronics are also pretty easy to get setup with one exception (which is kinda a major one) the Flight Control Board.
I was REALLY careful with orientation of all the wiring so I wouldn't get the thing flying sideways or have issues with LED's or the battery cable. I detached everything from the Tarantula but left it all in the shell so as not to turn anything around or get something upside down. I mounted up the motors, gears and props on the new frame more so I could flip it over and not worry about the FC board getting squished. The amount they get in the way is minimal and the protection of the top of the FC board is worth the little annoyance. When it was time to install the FC and wiring I just put them side by side, picked it up out of the Tarantula body and plopped it on the V262 frame.
Only issue I had as I have stated earlier was with the FC board and the mounting studs on the V262 frame are just slightly off. As you can see the screws will actually go through and in, but they are in contact with the edge of the FC Board. I tried it that way and it flew but after a minute of so she'd start to pitch off and need trimming and it would get gradually worse. (almost exactly the same issues reported with bad version #2 FC boards.. wondering if there is an easy fix there?)
Screws are just off the holes in the FC Board
So, I ended up cutting out a small bit of the FC board and used the stock Tarantula board dampeners. I put the fat dampener doughnuts under and the thinner ones on top then used the stock Tarantula screw which have the tiny washer built into the head, I screwed it all down, but not too tight. Holds and flies perfectly. There is a small area the doughnut over laps one of the LED spots on the board but it hasn't cause an issue yet.
Board after knocking out for mounting studs and after dampeners and screws installed
Lastly, I just used a thin piece of electrical tape to hold the wires in place out on the arms. I removed the LED that is normally at the top of the Tarantula and one of the eye ball LED's broke off during mounting and such so I just snipped it's wires and left only one up front which is also held in place with a simple strip of electrical tape to the front of the body. I might drill a small hole in the body there to slip it through later to get a cleaner look, but for now it actually works well.
Lastly are the legs, which I recorded a little video of how I made them. Here's the simple zip tie leg install method I used.
The legs actually work really well and even better than I thought as I had a major crash which broke the motor mount right off the quad. Leg held the mount to the body somewhat and prevented the motor cable from being totally yanked and from the whole chunk being lost.
After crash broken motor mount which leg held from flying away
That's basically it!! transferring the X6 over to a V262 frame really isn't all that hard and MAN the thing is quieter, faster and smoother flying. The best part is I have taken a pretty much destroyed Tarantula and made it totally flyable again with a rather small investment of money and time.
OK, I've seen people talk about all these quadcopter and state something like "micro quad" and "mini quad" or full size quadcopter. But there never seems to be a general consensus on what each "class" covers...
Well, I'm gunna state what I think is a good general rule to cover what each is, at least what makes sense to me... Again, this is very general and there are models that kinda float in-between or have features that usually are in another class.
"NANO-MICRO QUAD"
These are the smallest of the small, mainly lead in the market by the Cheerson CX 10 and the Estes ProtoX.. and a bunch of knock offs from Syma, JJRC and others. These things are tiny, very tiny!! Don't fly around the table at dinner time as these things can fall right inside the average water glass.
If you put 3 of your fingers together they are wider than these things are. FUN!! Pretty much for indoor flight though you can take them outside in low wind. Usually have built in batteries as the extra material to make a battery door, cabling, and plug ends would add too much weight. Most are direct drive propellers that push onto the brushed motor's drive shaft. Most have a very tiny transmitter that are smaller than the Xbox/playstation game pads many people are familiar with.
"MINI QUAD"
These are the little palm size class of quadcopter with the Walker Ladybird being the original market holder but in the last few years seemly dominated by the Hubsan X4 107, lot's of knock off and varieties like the Syma X11, JJRC 1000 and the "Top Selling X6" (yes that is the name of the thing) as well as at least a dozen others. Most are a bit on the "sporty" flight style flying rather quickly. These mostly are a good indoor/outdoor dual use quad as they are small enough to actually fly around in a room but big enough and powerful enough to fight a gentle wind easily. Generally having a game pad style transmitter (pretty much look just like an Xbox or Playstation game pad) all have removable "slip in" single cell batteries that very in size and power and are lipo and of the 3.7volt variety. Most are direct drive like the micro quads and have press on props direct to the brushed motor drive shaft, (only exception I know of is the Syma X11 which is gear driven with screw on props). Many models can come with video cameras built into the bodies, both in SD and HD for a little "home movie" fun. There are a few First Person View quads in the class, but image quality is generally low SD and the equipment is kinda heavy for these small of copters. "MID-SIZED QUAD"
These are the larger, mostly still in the "toy grade" of quadcopter generally around 12" (30 centimeters or so) square. Market is highly dominated by the Syma X5 with many down right copy cats of the looks. There are an abundance of others also in the last year or so like the JJRC X8 and many of the "department store" models out there. Many have cameras in little external cases. Not as "spunky' as those in the smaller classes do to their larger size and gear drive. This size is the mixing point between the toy grade brushed motors and the much higher quality, brushless motors. Most of the popular "Racing 250/350" First Person View (FPV) are in this size class and are mostly the starting point for custom built units. This is also the size things like GPS and high end electronics start coming really into play.
"FULL SIZED"
These used to be dominated by the $1000 and above Pro-sumer and professional grade DJI and Walker quadcopter, but in the last year there are a bunch of toy grade, around $100, models as well as a decent drop in the Pro-sumer grade models pricing. The new Syma X8 and the new Tarantula X6 are full sized quadcopter that are still in the toy grade for pricing and equipment but are really nice pushing almost into the prosumer grade, though not quite. These still have Brushed motors on the toy grade but the size is pretty much dominated by the brushless motor as you need it for real reliability lifting the weight. Full sized are generally setup to lift fancy, higher end camera equipment and fly longer and often times in the professional arena, are pre-programable to fly a pattern set with GPS software with little or no input from the controller after lift off. This class of quad is what the FAA is most concerned about as they have the power and range to get into the lower air traffic space.
"LARGE QUAD/DRONE"
Usually military grade carrying munitions like big guns, lasers, missiles or all the above. If you see one flying over you? you should probably hide!!
here's a video with both the stock lens and after screwing in the after market wide angle lens.. Think I need to do a bit more focusing, (or I might have gotten a finger print on it.) but it's more stable to watch video for sure.
RC groups forums as a latest deals section.. pretty good break down of parts and where to find as well as some pricing (which I'm guessing isn't auto updated? but still decent for basic research!!)
Here's a video with a decent set up and workings for the transmitter for the Hubsan X4
here's a little better one, for some reason he's blocked embedding it in forums/blogs... but it's 1/2 decent to walk you through a lot of the setting on the transmitter
This is going to hopefully be a site where we can post up, read, research and share info about the very addictive hobby of these mini RC quadcopter's. Will keep it simple, not going to have info on custom built high end quad's, just these basic, mostly under $100 mini class of RTF units. though modding and customizing these WILL be included!! :)
If you have any basic stuff you'd like to contribute just comment, or if it's some really useful piece of info send me an e-mail with it or a link to something and I'll try and get it up here!!